![[Note] Drive acquisition using dc3dd](https://www.forensics-matters.com/wp-content/uploads/2018/07/analogue-business-close-up-117729-825x510.jpg)
In this quick tutorial we will use dc3dd in order to obtain a raw image of an hard drive. dc3dd was developed at the Departement of Defense’s Cyber Crime Center and it is a patched version of the GNU dd command with added features for computer forensics. One of the main characteristic of dc3dd is that its code come from a fork of dd and for this reason dc3dd will be updated every time that dd is updated. dc3dd offers the possibility to make hashing on the fly with multiple algorithms (MD5, SHA-1, SHA-256, and SHA-512). First of all you need to find the hard drive from which you want to create a forensic image and you can do that with fdisk using this parameter:
sudo fdisk -l
The output will be similar to the one in the screenshot below:
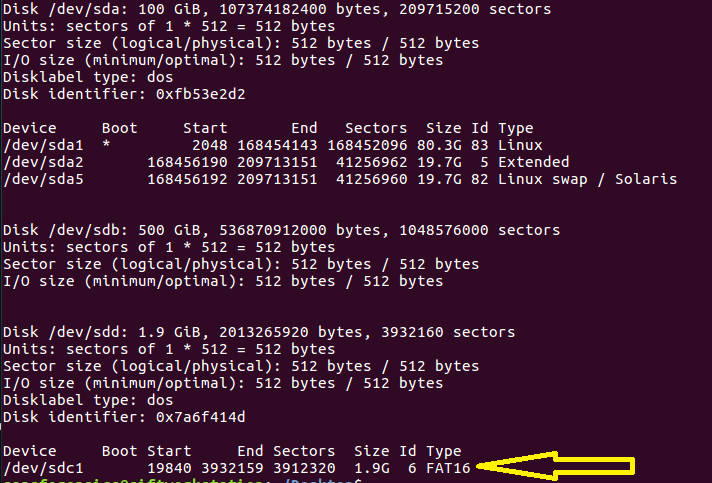
The device that will be acquired is indicated with a yellow arrow /dev/sdc1.
Finally we can run dc3dd, using these parameters:
sudo dc3dd if=/dev/sdc1 of=usb1_evidence_image.img hash=sha256 log=usb1_evidence.log
Explanation of the parameters:
if             => input file
/dev/sdc1      => source drive
of             => output file
hash           => On the fly hashing algorthm
log            => Path of the log file
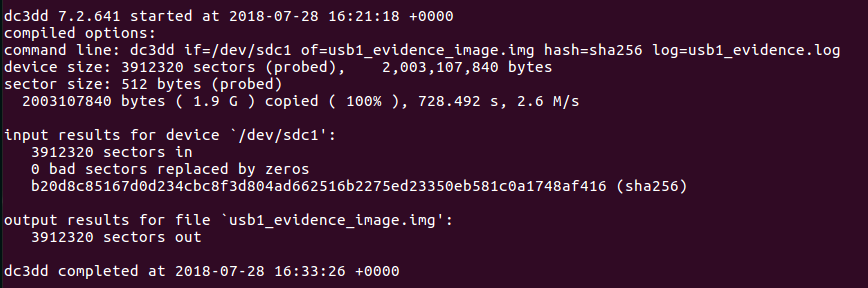
Then you will see the progress of dc3dd, like in the screenshot below:

After that, when dc3ddterminates, you will find the acquired image in the path that is indicated right after the parameter of= and you will also find the log file (that cointains the running output) in the path that is indicated right after the parameter log=. Furthermore, in the log file you will find the hash calculated for the image. An example of what is inside of the log file is showed in the screenshot below.