Quick guide to create a forensics image of a drive using dd, dc3dd and dcfldd.
See also this post:
dd
Brief description of the tool from wiki:
dd is a command-line utility for Unix and Unix-like operating systems, the primary purpose of which is to convert and copy files.
$ dd if=/dev/sdb1 of=/evidence/image.dd bs=4096
 conv=sync,noerror
Command explanation:
if=/dev/sdb1 is the source in this case is sdb1
of=/evidence/image.dd is where the output file is saved
bs=4096 is the block size (default is 512kb),
conv= sync, noerror conversion will continue even with read errors, if there is an error, null fill the rest of the block.
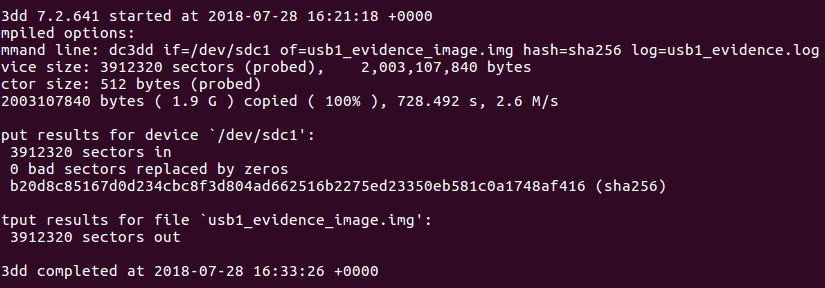
dc3dd
If you are interest in a complete drive acquisition guide, you can also refer to this article: drive acquisition using dc3dd
Brief description from the official website:
A patch to the GNU dd program, this version has several features intended for forensic acquisition of data. Highlights include hashing on-the-fly, split output files, pattern writing, a progress meter, and file verification.
$ dc3dd if=/dev/sdb1 of=/evidence/image.dd bs=4k hash=sha256 hashlog=hash.log log=image.log progress=onCommand explanation:
if=/dev/sdb1 is the source in this case is sdb1
of=/evidence/image.dd is where the output file is saved
bs=4k is the block size
hash=sha256 on the fly hashing algorithm
log=image.log is the output path for the log
hashlog=hash.log save hash output to hash.log instead of stderr
progress=on display a progress meter
dcfldd
Brief description from the official website:
dcfldd is an enhanced version of GNU dd with features useful for forensics and security. Based on the dd program found in the GNU Coreutils package, dcfldd has the following additional features:
- Hashing on-the-fly – dcfldd can hash the input data as it is being transferred, helping to ensure data integrity.
- Status output – dcfldd can update the user of its progress in terms of the amount of data transferred and how much longer operation will take.
- Flexible disk wipes – dcfldd can be used to wipe disks quickly and with a known pattern if desired.
- Image/wipe Verify – dcfldd can verify that a target drive is a bit-for-bit match of the specified input file or pattern.
- Multiple outputs – dcfldd can output to multiple files or disks at the same time.
- Split output – dcfldd can split output to multiple files with more configurability than the split command.
- Piped output and logs – dcfldd can send all its log data and output to commands as well as files natively.
$ dcfldd if=/dev/sdb1 conv=sync,noerror hash=sha256 hashlog=hash.log of=/evidence/image.ddCommand explanation:
if=/dev/sdb1 is the source in this case is sdb1
of=/evidence/image.dd
conv= sync, noerror conversion will continue even with read errors, if there is an error, null fill the rest of the block.
of=/evidence/image.dd is where the output file is saved
hash=sha256 on the fly hashing algorithm
hashlog=hash.log save hash output to hash.log instead of stderr