[Note] Drive acquisition using dc3dd

In this quick tutorial we will use dc3dd in order to obtain a raw image of an hard drive. dc3dd was developed at the Departement of Defense’s Cyber Crime Center and it is a patched version of the GNU dd command with added features for computer forensics. One of the main characteristic of dc3dd is that its code come from a fork of dd and for this reason dc3dd will be updated every time that dd is updated.  dc3dd offers the possibility to make hashing on the fly with multiple algorithms (MD5, SHA-1, SHA-256, and SHA-512). First of all you need to find the hard drive from which you want to create a forensic image and you can do that with fdisk using this parameter:

sudo fdisk -l

The output will be similar to the one in the screenshot below:

Output of fdisk -l

The device that will be acquired is indicated with a yellow arrow  /dev/sdc1.

Finally we can run dc3dd, using these parameters:

sudo dc3dd if=/dev/sdc1 of=usb1_evidence_image.img hash=sha256 log=usb1_evidence.log

Explanation of the parameters:

if             => input file
/dev/sdc1      => source drive
of             => output file
hash           => On the fly hashing algorthm 
log            => Path of the log file

Then you will see the progress of dc3dd, like in the screenshot below:

dc3dd running output

After that, when dc3ddterminates, you will find the acquired image in the path that is indicated right after the parameter of= and you will also find the log file (that cointains the running output) in the path that is indicated right after the parameter log=. Furthermore, in the log file you will find the hash calculated for the image. An example of what is inside of the log file is showed in the screenshot below.

Log file of dc3dd

Dump an Android Partition for forensic analysis

In this guide we will dump a memory partition from an Android device to do some forensic activities on it.

Prerequisites:

  • Android rooted device
  • A forensic workstation with adb (Android Dubug Bridge)
  • busybox installed on the android device

First of all, we connect the Android device to our forensic workstation through USB, then we open a terminal.

To ensure that the device is properly connected and ADB is working, we try to use this command:

$ adb devices

Then we should see something like this as output, that is the list of the connected devices:

adb devices command output

Now that we are sure that the device is connected, we need to start an adb shell with this command:

$ adb shell

And then we become root with this command:

$ su -

Now we can list all the mounting points with their familiar names on the device with this other command:

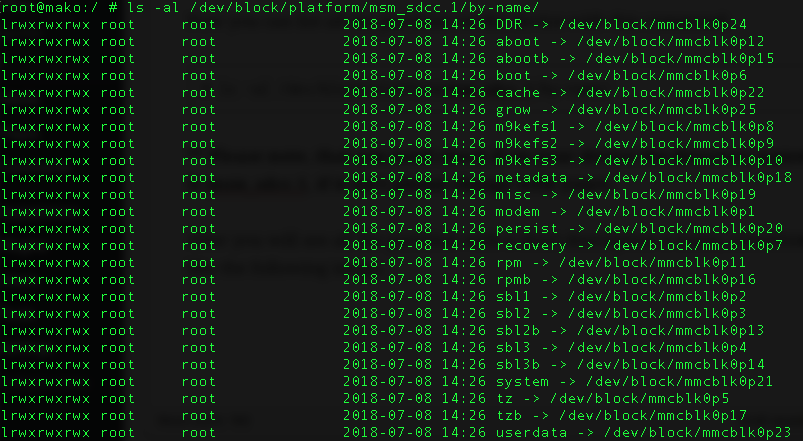
# ls -al /dev/block/platform/msm_sdcc.1/by-name 

** Please note that you need to check if on your device the directory name is msm_sdcc.1, if it isn’t please change with yours.

After we see all the mounting points with their familiar names (boot, cache, userdata…. ) something like the following output will appear.

After this we can choose which of those blocks we want to dump, then we can use dd (data dump) command to create a bit-for-bit image. For transferring the file we use netcat.

First of all we open a new terminal screen, and we forward the port tcp 8888 as following: (Basically it means that the requests on port 8888 on the host will be forwarded to port 8888 on the device. Where the first port is the host and the second one is the device port)

$ adb forward tcp:8888 tcp:8888

Now we open an adb shell and become root as we did before:

$ adb shell

$ su -

Now we start our data dumping and we append the output to an open port through busybox netcat (we will open the port 8888 for listening, the one that we enable to forwarding before), and we will receive the dump on another terminal:

# dd if=/dev/block/mmcblk0p23 | busybox nc -l -p 8888

Now immediately open on a new terminal on the forensics workstation with a netcat for retrieving the data:

$ nc 127.0.0.1 8888 > userdata_dump.img

When the dd finish, “userdata_dump.img” will be ready to be analyzed! Enjoy!

Install foremost on OS X

Foremost is a console program for recovering file, from an image (like those generated by dd, dc3dd, Encase…) or directly from a drive based on their headers, footers, and internal data structures. A lot of headers and footers (JPG, GIF, PNG, DOC, XLS…) are built-in in the program others be specified by a configuration file.

In this tutorial we will install foremost on OS X, by downloading it from the official repository.

So, first of all, download the sources from the official repository on sourceforge:

$ wget http://foremost.sourceforge.net/pkg/foremost-1.5.7.tar.gz

Untar the file previously downloaded:

$ tar zxvf foremost-1.5.7.tar.gz

Open the directory where you extracted foremost:

$ cd foremost-1.5.7
Compile:
$  sudo make mac
Install:
$ sudo make macinstall
Now you have successfully installed foremost on OS X,
Note:

Foremost is installed in:

 /usr/local/bin/

Foremost configuration file is in:

/usr/local/etc/foremost.conf
I tested this installation on macOs High Sierra (10.13.5)