Elevate Your Brand Monitoring Game with urlDNA!

Embark on a journey of brand empowerment as https://urlDNA.io introduces its latest feature that places the reins firmly in the hands of users – brand monitoring! This function is crafted to endow esteemed users with the ability to effortlessly keep a watchful eye on their brand. And the cherry on top? It’s completely free for all registered members.

Ready to take charge? Dive into the world of brand monitoring at https://urldna.io

Here’s a quick rundown of how this game-changer operates:

How It Works:

Monitoring a brand has never been smoother. Just a handful of easy steps stand between users and brand vigilance:
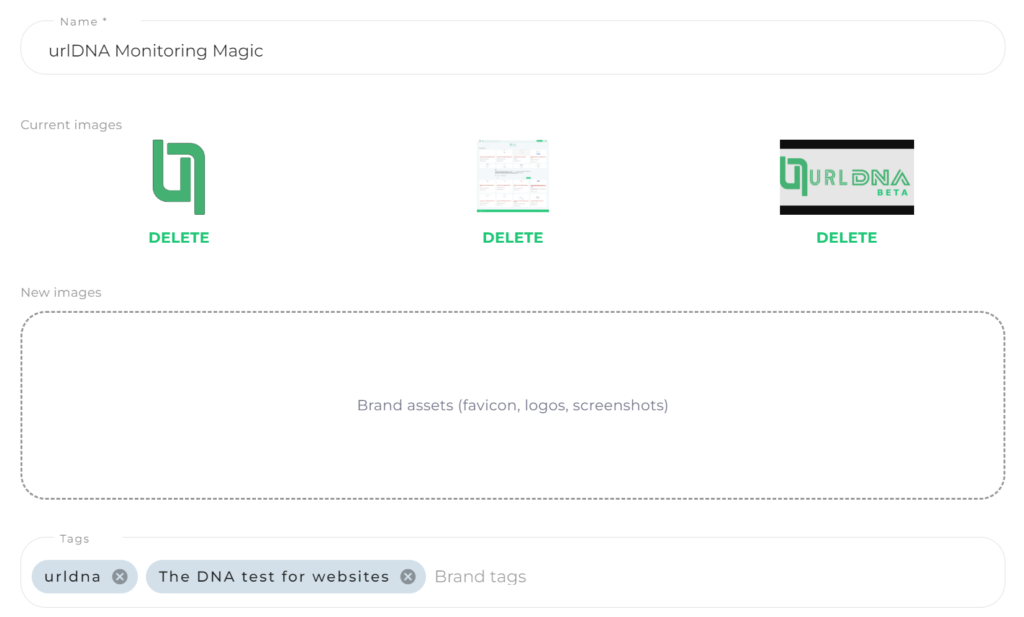
Rule Name:

Craft a snappy and unforgettable name for the monitoring rule. Let’s concoct a rule for the urlDNA brand – “urlDNA Monitoring Magic.”

Brand Assets:

Share the visual essence of the brand. Upload screenshots, logos, favicons – every element that defines the uniqueness of urlDNA. Watch in awe as the cutting-edge algorithm scours the extensive database to spot occurrences related to the brand.

Tags:

Supercharge the monitoring by adding relevant keywords. For the urlDNA example, throw in “urldna” and the tagline, like “The DNA test for websites.” You can even toss in specific page names to tailor the monitoring to precise needs.

Setting Up Your Rule:

Ready to dive in? Follow these straightforward steps:

  1. Click the Brand Monitor Button: Exclusive to registered users, this menu is the portal to brand monitoring excellence.
  2. Create a New Brand Monitor: Click on the “New Brand Monitor” button to kick off the setup process.
  3. Enter urlDNA Data: Fill in the essential information for the urlDNA rule, covering the rule name, brand assets, and relevant tags.
  4. Sit Back and Explore: With everything set up, witness the enchantment unfold as the system showcases all the pages aligning with the monitoring rule.

Join the league of content registered users who are already harnessing the power of urlDNA’s brand monitoring. Seize this extraordinary opportunity to fortify the brand’s online presence. Don’t let this chance slip by – sign up today and revel in a newfound level of control over urlDNA’s narrative! Start monitoring today at https://urldna.io

Credits:
Original blog post: https://blog.urldna.io/2024/01/brand-monitoring.html
Photo by Tobias Tullius on Unsplash

urldna.io search function

urldna.io is a powerful and user-friendly website designed to provide individuals and researchers with the ability to extract valuable information from URLs. With its intuitive interface, this platform offers a seamless experience for uploading and analyzing URLs to extract and analyze relevant data.

You can find the original guide on the official blog of urldna.io: https://blog.urldna.io/2023/05/guide-to-using-search-function-on.html

The search function on urldna.io allows you to find specific information about URLs or domains using either a direct search or a custom query language. This guide will walk you through the process of using the search function effectively

To perform a direct search, simply type the word that you want to search directly into the search bar.

Example: example will find all the submitted urls that cointain example.

Custom Query Language

The Custom Query Language allows you to perform more specific searches using attributes, operators, and values. The basic structure of a Custom Query Language search is: ATTRIBUTE OPERATOR VALUE

Available Attributes

The following attributes can be used in the Custom Query Language searches:

  • domain: Scan a domain
  • submitted_url: Submitted URL
  • category: Page category
  • target_url: Redirected URL
  • device: Device type (MOBILE or DESKTOP)
  • user_agent: Web browser user agent
  • origin: Search origin (USER or API)
  • title: Page title
  • ip: IP address
  • org: Organization
  • isp: Internet Service Provider
  • asn: ASN (Autonomous System Number)
  • city: City
  • country_code: Country Code
  • favicon: Favicon hash
  • screenshot: Screenshot hash
  • serial_number: Certificate serial number
  • issuer: Certificate issuer
  • subject: Certificate subject
  • malicious: Flagged as malicious (1 for malicious, 0 for valid)
  • technology: Technology used in the website
  • cookie_name: Cookie name
  • cookie_value: Cookie value

Available Operators

The following operators can be used in the Custom Query Language searches:

  • =: Equal to
  • !=: Not equal to
  • LIKE: Contains
  • !LIKE: Does not contain

Combining Operators

You can combine multiple operators in a single search using the AND keyword.

Example: title LIKE PayPal AND domain != paypal

Examples

Here are a few examples to illustrate how to use the Custom Query Language:

  • Search for domains containing “google”: domain LIKE google
  • Search for titles containing “PayPal” but not domains containing “paypal”: title LIKE PayPal AND domain !LIKE paypal
  • Search for websites flagged as malicious: malicious = 1
  • Search for websites with a specific favicon hash: favicon LIKE d40750994fe739d8

By following this guide, you will be able to effectively use the search function on urldna.io to find specific information about URLs or domains using either a direct search or the Custom Query Language.

Simple Forensics imaging with dd, dc3dd & dcfldd

Quick guide to create a forensics image of a drive using dd, dc3dd and dcfldd.

See also this post:

dd

Brief description of the tool from wiki:

dd is a command-line utility for Unix and Unix-like operating systems, the primary purpose of which is to convert and copy files.

$ dd if=/dev/sdb1 of=/evidence/image.dd bs=4096
 conv=sync,noerror

Command explanation:

if=/dev/sdb1 is the source in this case is sdb1

of=/evidence/image.dd is where the output file is saved

bs=4096 is the block size (default is 512kb),

conv= sync, noerror conversion will continue even with read errors, if there is an error, null fill the rest of the block.

dc3dd

If you are interest in a complete drive acquisition guide, you can also refer to this article: drive acquisition using dc3dd

Brief description from the official website:

A patch to the GNU dd program, this version has several features intended for forensic acquisition of data. Highlights include hashing on-the-fly, split output files, pattern writing, a progress meter, and file verification.

$ dc3dd if=/dev/sdb1 of=/evidence/image.dd bs=4k hash=sha256 hashlog=hash.log log=image.log progress=on

Command explanation:

if=/dev/sdb1 is the source in this case is sdb1

of=/evidence/image.dd is where the output file is saved

bs=4k is the block size

hash=sha256 on the fly hashing algorithm

log=image.log is the output path for the log

hashlog=hash.log save hash output to hash.log instead of stderr

progress=on display a progress meter

dcfldd

Brief description from the official website:

dcfldd is an enhanced version of GNU dd with features useful for forensics and security. Based on the dd program found in the GNU Coreutils package, dcfldd has the following additional features:

  • Hashing on-the-fly – dcfldd can hash the input data as it is being transferred, helping to ensure data integrity.
  • Status output – dcfldd can update the user of its progress in terms of the amount of data transferred and how much longer operation will take.
  • Flexible disk wipes – dcfldd can be used to wipe disks quickly and with a known pattern if desired.
  • Image/wipe Verify – dcfldd can verify that a target drive is a bit-for-bit match of the specified input file or pattern.
  • Multiple outputs – dcfldd can output to multiple files or disks at the same time.
  • Split output – dcfldd can split output to multiple files with more configurability than the split command.
  • Piped output and logs – dcfldd can send all its log data and output to commands as well as files natively.
$ dcfldd if=/dev/sdb1 conv=sync,noerror hash=sha256 hashlog=hash.log of=/evidence/image.dd

Command explanation:

if=/dev/sdb1 is the source in this case is sdb1

of=/evidence/image.dd

conv= sync, noerror conversion will continue even with read errors, if there is an error, null fill the rest of the block.

of=/evidence/image.dd is where the output file is saved

hash=sha256 on the fly hashing algorithm

hashlog=hash.log save hash output to hash.log instead of stderr

Forensics timeline using plaso log2timeline for Windows

As you may know, the popular tool log2timeline can be also used directly on Windows. But the question is, why do I need to use log2timeline on windows? The answers is quite easy, for performance purpose.

log2timeline is a fantastic tools, but the process of creating a forensics timeline can be long and time consuming, for this reason I prefer instead of using a virtualized enviroment, to use directly log2timeline for Windows.

In this guide, we will do a timeline using log2timeline for Windows.

First of all, let’s download the Windows version of plaso from the official Github repo (https://github.com/log2timeline/plaso/releases), then just look for the Windows 32 or 64.

Plaso for Windows

After the download, unzip the files, now you are ready to use plaso.

Let’s made our first timeline under Windows.

  • Open a cmd with administrator privileges, then move to the directory where you extracted plaso.
  • Use log2timeline.exe to gather the timeline data from your image.
log2timeline.exe plaso.dump drive_d.dd
  • Command explanation:
    • plaso.dump is the output file
    • drive_d.dd is the bitestream copy of the drive of which you want to create a timeline

  • You may choose the partition on which you want that log2timeline will collect data, in my case is p3 as you can see in the picture below.
Select log2timeline partition
  • You may also choose the vss (Volume Snapshot Service) that you want to include in your timeline. Press enter if you don’t want to include any vss.
  • Wait until the process is completed, it can last several hours.
  • When the process is finished you can run isort.exe for filter the timeline data.
psort.exe -z "UTC" -o L2tcsv plaso.dump "date > '2020-09-01 00:00:00' AND date < '2012-10-15 00:00:00'" -w timeline.csv
  • Command explanation:
    • -z is the timezone, in this case UTC
    • -o is the output time, in this case CSV
    • plaso.dump is the file created with log2timeline
    • date (YYYY-MM-DD HH:MM:SS) is the timeslot on which you want to create the timeline.
    • -w timeline.csv is the output CSV file

  • Now you have the CSV, with the data of your timeline.
  • For a better visualization import the csv into the xlsx file created by Rob Lee, that you can find at this link: https://www.sans.org/blog/digital-forensic-sifting-colorized-super-timeline-template-for-log2timeline-output-files/
  • Enjoy your first windows created timeline!

Find out Windows installation date

There are a lot of ways to determine when a Windows operating system have been installed on a machine. In this post you will find some examples.

The installation date is very important during a forensic invegation in order to quickly understand when a Windows operating system have been installed on the analyzed machine.

Please bare in mind, that on Windows 10, this date can refer to the last major update (e.g. creators update).

      1. Extraction from Windows registry with Powershell:

        It is possible to retrieve the date and the time directly from a registry which is:

        HKEY_LOCAL_MACHINE\SOFTWARE\Microsoft\Windows NT\CurrentVersion\InstallDate

        The value of the registry key “InstallDate” is expressed as UNIX time, in a few words, it displays the time in number of seconds since 1st Jan 1970.
        You can obtain a readeable value with Powershell, writing:

        $date = Get-ItemProperty -Path 'HKLM:\SOFTWARE\Microsoft\Windows NT\CurrentVersion\' | select -ExpandProperty InstallDate

        The variable $date contains the installation datetime in UNIX time. In order to convert it into a human readable format in the same Powershell, you shall write:

        (Get-Date "1970-01-01 00:00:00.000Z") + ([TimeSpan]::FromSeconds($date))

        Now you have a human readable installation date time.

        Requirement: Powershell
        SO: Windows 7+

        Extracting from Windows registry with Powershell
      2. Using systeminfo via CMD:

        Systeminfo displays configuration information about a computer and its operating system, and also the Original Installation Date. To extract the installation date, open a cmd and type:

        systeminfo | find /i "original"

        Using the string “Original Install Date” please note that in order to find valid information, your OS language shall be English, otherwise you may not be able to find anything.
        Requirement: cmd
        SO: Windows XP+

      3. Using WMI via Powershell:

        It is also possible to extract the installation date and time with WMI, which stands for “Windows Management Instrumentation“. Open a powershell windows and write this command:

        ([WMI]'').ConvertToDateTime((Get-WmiObject Win32_OperatingSystem).InstallDate)

        With this command, you will get the installation date in a human readable format.
        Requirement: Powershell
        SO: Windows 7+

      4. Client side Cache Folder on Windows 10:

        On Windows 10, all the methods listed before, could retrieve the date of the last major updates (e.g. creators update) and not the Original Installation date.
        A nice way to find the closest thing to the original installation date on a Windows 10 system is to look at the “last write time” of the client side cache and you can do it by using powershell:

        Get-Item C:\Windows\CSC\


        The “Last Write Time” is one of the closest things to the original installation date of the system.
        Please refer also to this interesting discussion.

        Requirement: Powershell
        SO: Windows 10

If you use other methods to get the installation date, please share them in the comment box.


Extract GPS data from JPEG using imago

Nowadays a lot of images contain GPS data. This data are useful in order to remember the exact position where a photo was taken. Those data are used by social networks to suggest you a location for your image.

GPS data can be very useful also during a digital investigation, because they can give you a lot of information about the place where the picture was shoot.

With imago  https://github.com/redaelli/imago-forensics (a python tool that I made) extracting GPS data from JPEG can be very easy and fast.

Continue reading Extract GPS data from JPEG using imago

[Note] Drive acquisition using dc3dd

In this quick tutorial we will use dc3dd in order to obtain a raw image of an hard drive. dc3dd was developed at the Departement of Defense’s Cyber Crime Center and it is a patched version of the GNU dd command with added features for computer forensics. One of the main characteristic of dc3dd is that its code come from a fork of dd and for this reason dc3dd will be updated every time that dd is updated.  dc3dd offers the possibility to make hashing on the fly with multiple algorithms (MD5, SHA-1, SHA-256, and SHA-512). First of all you need to find the hard drive from which you want to create a forensic image and you can do that with fdisk using this parameter:

sudo fdisk -l

The output will be similar to the one in the screenshot below:

Output of fdisk -l

The device that will be acquired is indicated with a yellow arrow  /dev/sdc1.

Finally we can run dc3dd, using these parameters:

sudo dc3dd if=/dev/sdc1 of=usb1_evidence_image.img hash=sha256 log=usb1_evidence.log

Explanation of the parameters:

if             => input file
/dev/sdc1      => source drive
of             => output file
hash           => On the fly hashing algorthm 
log            => Path of the log file

Then you will see the progress of dc3dd, like in the screenshot below:

dc3dd running output

After that, when dc3ddterminates, you will find the acquired image in the path that is indicated right after the parameter of= and you will also find the log file (that cointains the running output) in the path that is indicated right after the parameter log=. Furthermore, in the log file you will find the hash calculated for the image. An example of what is inside of the log file is showed in the screenshot below.

Log file of dc3dd

Dump an Android Partition for forensic analysis

In this guide we will dump a memory partition from an Android device to do some forensic activities on it.

Prerequisites:

  • Android rooted device
  • A forensic workstation with adb (Android Dubug Bridge)
  • busybox installed on the android device

First of all, we connect the Android device to our forensic workstation through USB, then we open a terminal.

To ensure that the device is properly connected and ADB is working, we try to use this command:

$ adb devices

Then we should see something like this as output, that is the list of the connected devices:

adb devices command output

Now that we are sure that the device is connected, we need to start an adb shell with this command:

$ adb shell

And then we become root with this command:

$ su -

Now we can list all the mounting points with their familiar names on the device with this other command:

# ls -al /dev/block/platform/msm_sdcc.1/by-name 

** Please note that you need to check if on your device the directory name is msm_sdcc.1, if it isn’t please change with yours.

After we see all the mounting points with their familiar names (boot, cache, userdata…. ) something like the following output will appear.

After this we can choose which of those blocks we want to dump, then we can use dd (data dump) command to create a bit-for-bit image. For transferring the file we use netcat.

First of all we open a new terminal screen, and we forward the port tcp 8888 as following: (Basically it means that the requests on port 8888 on the host will be forwarded to port 8888 on the device. Where the first port is the host and the second one is the device port)

$ adb forward tcp:8888 tcp:8888

Now we open an adb shell and become root as we did before:

$ adb shell

$ su -

Now we start our data dumping and we append the output to an open port through busybox netcat (we will open the port 8888 for listening, the one that we enable to forwarding before), and we will receive the dump on another terminal:

# dd if=/dev/block/mmcblk0p23 | busybox nc -l -p 8888

Now immediately open on a new terminal on the forensics workstation with a netcat for retrieving the data:

$ nc 127.0.0.1 8888 > userdata_dump.img

When the dd finish, “userdata_dump.img” will be ready to be analyzed! Enjoy!

Install foremost on OS X

Foremost is a console program for recovering file, from an image (like those generated by dd, dc3dd, Encase…) or directly from a drive based on their headers, footers, and internal data structures. A lot of headers and footers (JPG, GIF, PNG, DOC, XLS…) are built-in in the program others be specified by a configuration file.

In this tutorial we will install foremost on OS X, by downloading it from the official repository.

So, first of all, download the sources from the official repository on sourceforge:

$ wget http://foremost.sourceforge.net/pkg/foremost-1.5.7.tar.gz

Untar the file previously downloaded:

$ tar zxvf foremost-1.5.7.tar.gz

Open the directory where you extracted foremost:

$ cd foremost-1.5.7
Compile:
$  sudo make mac
Install:
$ sudo make macinstall
Now you have successfully installed foremost on OS X,
Note:

Foremost is installed in:

 /usr/local/bin/

Foremost configuration file is in:

/usr/local/etc/foremost.conf
I tested this installation on macOs High Sierra (10.13.5)